Dans ce post, nous allons nous intéresser à simuler et visualiser un pendule double.
Le pendule double consiste en un pendule à l’extrémité duquel on accroche un autre pendule. C’est un exercice classique de mécanique. On a donc deux tiges de longueur l1 et l2, de masse nulle ainsi que de deux masses m1 et m2. Son évolution est généralement chaotique.
I°) Les equations de mouvement

Ces equations proviennent des equations cinématiques, et des forces du pendule double. Pour plus d’informations sur la manière de les obtenir, allez sur ce site :
https://www.myphysicslab.com/pendulum/double-pendulum-en.html.
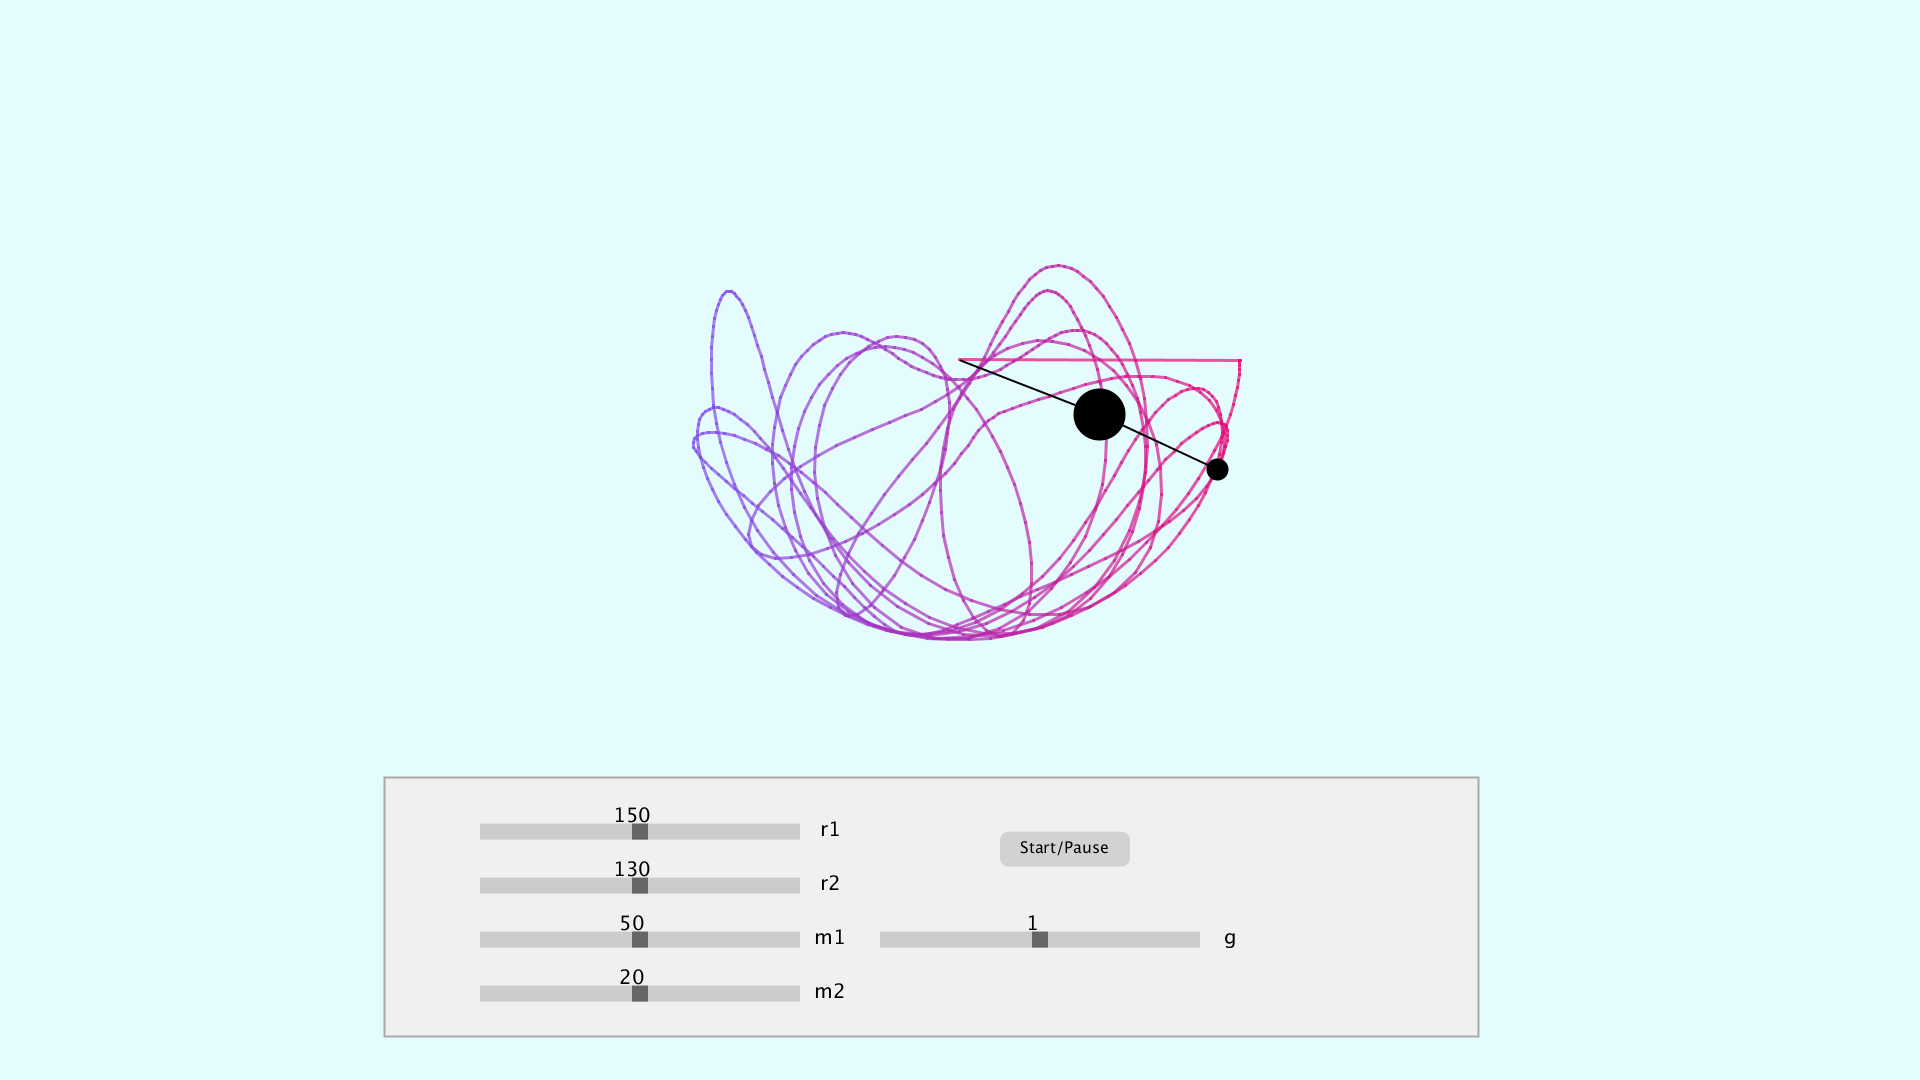
II°) Résultats
III°) Code
Ce code est composé en deux parties :
- La simulation et visualisation du pendule double,
- La création d’une interface utilisateur interactive.
III-1°) Simulation et visualisation
Le double pendule nécessite un bon paquet d’informations, notamment la longueur des axes : r1 et r2, la masses des pendules : m1 et m2, l’angle des pendules : a1 et a2, leurs vitesses a1_v et a2_v ainsi que leurs acceleration a1_a et a2_a.
// *****************************************************************************
//                                   PARAMETERS
// *****************************************************************************
// Double pendulum parameters
float r1 = 150;  // Radius axe n°1
float r2 = 130;  // Radius axe n°2
float m1 = 50;   // Masse object n°1
float m2 = 20;   // Masse object n°2
float a1 = PI/2; // Angle n°1
float a2 = PI/2; // Angle n°2
float a1_v = 0;  // Velocity n°1
float a2_v = 0;  // Velocity n°2
float a1_a = 0;  // Acceleration n°1
float a2_a = 0;  // Acceleration n°2
float g = 0.1;   // gravitational acceleration
D’autres paramètres liés à l’affichage du pendule double, et particulièrement à sa trace sont nécessaires :
// Ghost parameters
float px2 = -1;
float py2 = -1;
PGraphics canvas;
int cnt = 0;
color[] colours = new color[4];

// Translation parameters
float cx;
float cy;
Enfin, des paramètres pour convertir les coordonnées polaires en cartésiennes sont nécessaires.
// Cartesian position
float x1, x2, y1, y2;
Dans la partie setup(), nous retrouvons : l’initialisation des couleurs que l’on souhaite utiliser, de la trace du pendule double et enfin le calcul des coordonnées cartésiennes des deux pendules.
// *****************************************************************************
//                                     SETUP
// *****************************************************************************
void setup() {
  fullScreen();
  //size(900, 900);

  // Init colors
  colorMode(RGB, 255, 255, 255, 1);
  pixelDensity(1);
  colours[0] = color(229, 252, 255, 0.3);
  colours[1] = color(122, 79, 242, 0.7);
  colours[2] = color(230, 9, 116, 0.7);
  colours[3] = color(229, 252, 255);

  // Init ghost
  cx = width/2;
  cy = height/3;
  canvas = createGraphics(width, height);
  canvas.beginDraw();
  canvas.background(colours[3]);
  canvas.endDraw();

  // Let's do the calculation at least once
  x1 = r1 * sin(a1);
  y1 = r1 * cos(a1);
  x2 = x1 + r2 * sin(a2);
  y2 = y1 + r2 * cos(a2);
}
Enfin, dans la partie draw(), nous avons :
// *****************************************************************************
//                                     DRAW
// *****************************************************************************
void draw() {
  image(canvas, 0, 0);
  stroke(170);
  fill(240);
  rect(width/5, 0.72*height, 0.57*width, 0.24*height);
  noStroke();
  noFill();

  // Display pendulum
  stroke(0);
  strokeWeight(2);
  translate(cx, cy);
  line(0, 0, x1, y1);
  fill(0);
  ellipse(x1, y1, m1, m1);
  line(x1, y1, x2, y2);
  fill(0);
  ellipse(x2, y2, m2, m2);

  // Motion equations
  float num1 = -g*(2*m1 + m2) * sin(a1) - m2*g*sin(a1-2*a2) -2*sin(a1 - a2)*m2*(a2_v*a2_v*r2 + a1_v*a1_v*r1*cos(a1-a2));
  float den1 = r1*(2 * m1 + m2 - m2 * cos(2*a1 - 2*a2));
  a1_a = num1/den1;
  float num2 = 2*sin(a1-a2)*(a1_v*a1_v*r1*(m1+m2) + g*(m1+m2)*cos(a1) + a2_v*a2_v*r2*m2*cos(a1-a2));
  float den2 = r2*(2*m1 + m2 - m2*cos(2*a1 - 2*a2));
  a2_a = num2/den2;

  // Calculate cartesian coordinates
  x1 = r1 * sin(a1);
  y1 = r1 * cos(a1);
  x2 = x1 + r2 * sin(a2);
  y2 = y1 + r2 * cos(a2);

  // Get velocity and acceleration
  a1_v += a1_a;
  a2_v += a2_a;
  a1 += a1_v;
  a2 += a2_v;

  // Let's add a damping factor
  a1_v *= 0.999;
  a2_v *= 0.999;

  // Displaying the ghost of the double pendulum
  canvas.beginDraw();
  canvas.translate(cx, cy);
  canvas.strokeWeight(3);
  if (frameCount > 1) {
    // Let's put a color gradient effect between purple and red colors.
    float trans = map(x2, -1*(r1+r2), r1 + r2, 0, 1);
    color lineColour = lerpColor(colours[1], colours[2], trans);
    canvas.stroke(lineColour);
    canvas.line(px2, py2, x2, y2);
  }
  canvas.endDraw();

  px2 = x2;
  py2 = y2;
}
III-2°) Interface utilisateur (GUI)
Dans cette partie, j’utilise des classes pour créer mon bouton Play/Pause, ainsi que les HScrollbar. Je les instancie dans la partie maître, et check en permanent leur état afin de rendre cette interface interactive.
La classe Button pour le bouton Play/Pause est la suivante :
class Button {
  // *****************************************************************************
  //                                   PARAMETERS
  // *****************************************************************************
  float xpos; // X pos of the button
  float ypos;
  float widthButton;
  float heightButton;
  color rectColor;
  color rectHighlight;
  boolean rectOver = false;
  boolean locked = false;
  int cnt = 0;
  String name;
  boolean state = false;


  // *****************************************************************************
  //                                   CONSTRUCTOR
  // *****************************************************************************
  Button(float xpos_, float ypos_, float widthButton_, float heightButton_, String name_) {
    xpos = xpos_;
    ypos = ypos_;
    widthButton = widthButton_;
    heightButton = heightButton_;
    name = name_;
    rectColor = color(210);
    rectHighlight = color(190);
  }


  // *****************************************************************************
  //                                   METHODS
  // *****************************************************************************

  // ***********************
  boolean overRect(float x, float y, float width, float height) {
    if (mouseX >= x && mouseX <= x+width &&
      mouseY >= y && mouseY <= y+height) {
      return true;
    } else {
      return false;
    }
  }


  // ***********************
  boolean update() {
    if (overRect(xpos, ypos, widthButton, heightButton)) {
      rectOver = true;
      if (mousePressed == true && locked == false) {
        locked = true;
        state = !state;
        delay(200);
        locked = false;
      }
    } else {
      rectOver = false;
    }
    return state;
  }


  // ***********************
  void display() {
    noStroke();
    if (rectOver) {
      fill(rectHighlight);
    } else {
      fill(rectColor);
    }
    rect(xpos, ypos, widthButton, heightButton, 10, 10, 10, 10);
    textSize(16);
    textAlign(CENTER, CENTER);
    fill(0);
    text(name, xpos, ypos-4, widthButton, heightButton);
    textAlign(CENTER);
  }
}
La classe Hscrollbar pour les sliders est la suivante :
class HScrollbar {
  // *****************************************************************************
  //                                   PARAMETERS
  // *****************************************************************************
  int swidth, sheight;    // width and height of bar
  float xpos, ypos;       // x and y position of bar
  float spos, newspos;    // x position of slider
  float sposMin, sposMax; // max and min values of slider
  int loose;              // how loose/heavy
  boolean over;           // is the mouse over the slider?
  boolean locked;
  float ratio;
  String name;
  int sh, sw;
  float min, max;
  float spos_map;


  // *****************************************************************************
  //                                   CONSTRUCTOR
  // *****************************************************************************
  HScrollbar (float xp, float yp, int sw_, int sh_, int l, String name_, float min_, float max_, float beginValue_) {
    swidth = sw_;
    sheight = sh_;
    int widthtoheight = sw_ - sh_;
    ratio = (float)sw_ / (float)widthtoheight;
    xpos = xp;
    ypos = yp-sheight/2;
    spos = xpos + swidth/2 - sheight/2;
    newspos = spos;
    sposMin = xpos;
    sposMax = xpos + swidth - sheight;
    loose = l;
    name = name_;
    min = min_;
    max = max_;
    spos_map = beginValue_;
  }


  // *****************************************************************************
  //                                   METHODS
  // *****************************************************************************

  // ***********************
  void update() {
    if (overEvent()) {
      over = true;
    } else {
      over = false;
    }
    if (mousePressed && over) {
      locked = true;
    }
    if (!mousePressed) {
      locked = false;
    }
    if (locked) {

      newspos = constrain(mouseX-sheight/2, xpos, xpos + swidth - sheight);
    }
    if (abs(newspos - spos) > 1) {
      spos = spos + (newspos-spos)/loose;
      spos_map = map(spos, xpos, xpos + swidth - 1.5*sheight, min, max);
    }
  }


  // ***********************
  float constrain(float val, float minv, float maxv) {
    return min(max(val, minv), maxv);
  }


  // ***********************
  boolean overEvent() {
    if (mouseX > xpos && mouseX < xpos+swidth &&
      mouseY > ypos && mouseY < ypos+sheight) {
      return true;
    } else {
      return false;
    }
  }


  // ***********************
  void display() {
    noStroke();
    fill(204);
    rect(xpos, ypos, swidth, sheight);
    textSize(20);
    textAlign(CENTER);
    fill(0);
    text(name, xpos + swidth + 30, ypos + 0.8*sheight );
    text((int)spos_map, spos, ypos-2);
    if (over || locked) {
      fill(0, 0, 0);
    } else {
      fill(102, 102, 102);
    }
    rect(spos, ypos, sheight, sheight);
  }


  // ***********************
  float getPos() {
    return (float)spos_map;
    //return (float)spos_map * ratio;
  }
}
Enfin, la classe maître devient :
 // *****************************************************************************
//                                   PARAMETERS
// *****************************************************************************
// Double pendulum parameters
float r1 = 150;  // Radius axe n°1
float r2 = 130;  // Radius axe n°2
float m1 = 50;   // Masse object n°1
float m2 = 20;   // Masse object n°2
float a1 = PI/2; // Angle n°1
float a2 = PI/2; // Angle n°2
float a1_v = 0;  // Velocity n°1
float a2_v = 0;  // Velocity n°2
float a1_a = 0;  // Acceleration n°1
float a2_a = 0;  // Acceleration n°2
float g = 0.1;   // gravitational acceleration

// Translation parameters
float cx;
float cy;

// Ghost parameters
float px2 = -1;
float py2 = -1;
PGraphics canvas;
int cnt = 0;
color[] colours = new color[4];

// Cartesian position
float x1, x2, y1, y2;

// GUI Parameters
HScrollbar hs_r1, hs_r2, hs_m1, hs_m2, hs_a1, hs_a2, hs_g;
Button b_start, b_stop, b_reset;


// *****************************************************************************
//                                     SETUP
// *****************************************************************************
void setup() {
  fullScreen();
  //size(900, 900);

  // Init colors
  colorMode(RGB, 255, 255, 255, 1);
  pixelDensity(1);
  colours[0] = color(229, 252, 255, 0.3);
  colours[1] = color(122, 79, 242, 0.7);
  colours[2] = color(230, 9, 116, 0.7);
  colours[3] = color(229, 252, 255);

  // Init ghost
  cx = width/2;
  cy = height/3;
  canvas = createGraphics(width, height);
  canvas.beginDraw();
  canvas.background(colours[3]);
  canvas.endDraw();

  // Let's do the calculation at least once
  x1 = r1 * sin(a1);
  y1 = r1 * cos(a1);
  x2 = x1 + r2 * sin(a2);
  y2 = y1 + r2 * cos(a2);

  hs_r1 = new HScrollbar(width/4, 0.77*height, width/6, 16, 1, "r1", 10, 200, 150);
  hs_r2 = new HScrollbar(width/4, 0.82*height, width/6, 16, 1, "r2", 10, 200, 130);
  hs_m1 = new HScrollbar(width/4, 0.87*height, width/6, 16, 1, "m1", 10, 100, 50);
  hs_m2 = new HScrollbar(width/4, 0.92*height, width/6, 16, 1, "m2", 10, 100, 20);
  hs_g  = new HScrollbar(width/4 + 80 + width/6, 0.87*height, width/6, 16, 1, "g", 0, 20, 1);

  b_start = new Button(width/3 + 40 + width/6, 0.77*height, 130, 35, "Start/Pause");
}


// *****************************************************************************
//                                     DRAW
// *****************************************************************************
void draw() {
  image(canvas, 0, 0);
  stroke(170);
  fill(240);
  rect(width/5, 0.72*height, 0.57*width, 0.24*height);
  noStroke();
  noFill();

  // Get all GUI parameters
  hs_r1.update();
  hs_r1.display();
  hs_r2.update();
  hs_r2.display();
  hs_m1.update();
  hs_m1.display();
  hs_m2.update();
  hs_m2.display();
  hs_g.update();
  hs_g.display();

  // And use them here...
  boolean start = b_start.update();
  b_start.display();
  r1 = hs_r1.getPos();
  r2 = hs_r2.getPos();
  m1 = hs_m1.getPos();
  m2 = hs_m2.getPos();
  g = hs_g.getPos();


  // Display pendulum
  stroke(0);
  strokeWeight(2);
  translate(cx, cy);
  line(0, 0, x1, y1);
  fill(0);
  ellipse(x1, y1, m1, m1);
  line(x1, y1, x2, y2);
  fill(0);
  ellipse(x2, y2, m2, m2);


  if (start) {
    // Motion equations
    float num1 = -g*(2*m1 + m2) * sin(a1) - m2*g*sin(a1-2*a2) -2*sin(a1 - a2)*m2*(a2_v*a2_v*r2 + a1_v*a1_v*r1*cos(a1-a2));
    float den1 = r1*(2 * m1 + m2 - m2 * cos(2*a1 - 2*a2));
    a1_a = num1/den1;
    float num2 = 2*sin(a1-a2)*(a1_v*a1_v*r1*(m1+m2) + g*(m1+m2)*cos(a1) + a2_v*a2_v*r2*m2*cos(a1-a2));
    float den2 = r2*(2*m1 + m2 - m2*cos(2*a1 - 2*a2));
    a2_a = num2/den2;

    // Calculate cartesian coordinates
    x1 = r1 * sin(a1);
    y1 = r1 * cos(a1);
    x2 = x1 + r2 * sin(a2);
    y2 = y1 + r2 * cos(a2);

    // Get velocity and acceleration
    a1_v += a1_a;
    a2_v += a2_a;
    a1 += a1_v;
    a2 += a2_v;

    // Let's add a damping factor
    a1_v *= 0.999;
    a2_v *= 0.999;

    // Displaying the ghost of the double pendulum
    canvas.beginDraw();
    canvas.translate(cx, cy);
    canvas.strokeWeight(3);
    if (frameCount > 1) {
      // Let's put a color gradient effect between purple and red colors.
      float trans = map(x2, -1*(r1+r2), r1 + r2, 0, 1);
      color lineColour = lerpColor(colours[1], colours[2], trans);
      canvas.stroke(lineColour);
      canvas.line(px2, py2, x2, y2);
    }
    canvas.endDraw();

    px2 = x2;
    py2 = y2;
  }
}
